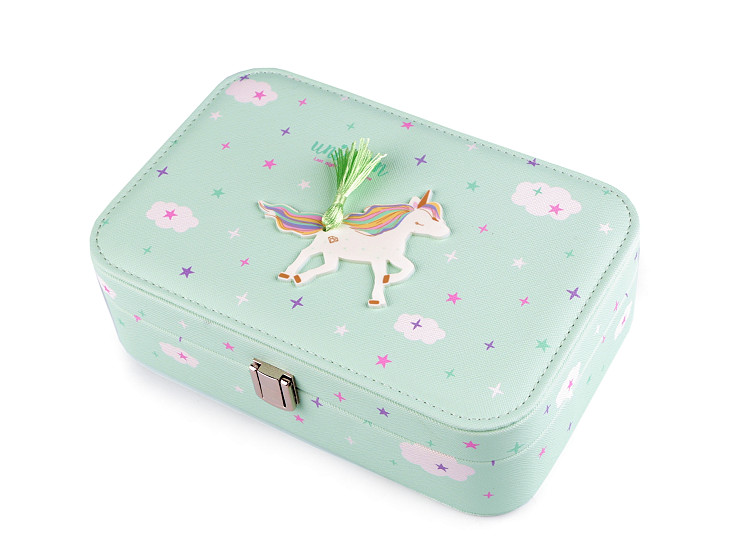
Crafting was something I enjoyed as a child. I loved to paint, color, and sew. Making jewelry, particularly friendship bracelets, was one of my favorite hobbies when I was younger. Now, fast forward to the present and I have a little girl who loves making unicorn jewelry box.
We have amassed a lot of bracelets and necklaces over the last few months. You can find them draped on drawer knobs, on top of counter tops or tangled in drawers. This seemed like the ideal time to organize my daughter’s new treasures. I decided to take her favorite animal (for the moment-ha!) I created this diy home Custom Vinyl Unicorn Jewelry Box. Evie, my daughter is obsessed with it. Evie actually said that this was “Perfection!” This little jewelry box is perfect for Evie’s jewelry collection.
You can watch the video tutorial below, which is great for beginners! Learn how to make your diy plumbing Custom Vinyl Unicorn Jewelry box!
These are the supplies that you will need
- Craftables Vinyl (Tiffany Blue and Lilac, as well as Soft Pink)
- Craftables Transfer Tape
- Cricut Machine
- Cutting Mat
- Weeding tool
- Squeegee (or credit card)
- Craftables Unicorn SVG File
Wooden Jewelry Box
- Spray paint job in White
- Painter’s Tape
- Screwdriver
Step 1: Use a screwdriver for the removal of the screws from the hinges. Cover the inside mirror with painter’s tape and then remove the drawer.
Step 2: Spray white spray paint sponges on the exterior, interior, and top sides of the jewelry box. Let dry. Apply another coat of spray paint and let dry.
Step 3: Click the link to download the unicorn template. Next, locate the zip file you saved on your computer and then open it.
Step 4: Click on “Upload” in Cricut Design Space. To upload the unicorn template, go to the location where it is saved. Then, click “save”. To add the image to your workspace, click on it.

Step 5: Click the image to resize it at 4.5 inches.
Step 6: Open a rectangular shape and reduce it to a small rectangle. To create another one, copy and paste the original. Place the rectangles next to each other, and then select both. Click “Align” or “Align at the bottom”.
Step 7: Drag the rectangles below your unicorn. Next, select the unicorn and both rectangles and copy them. Then paste two times.
Step 8: Choose the first unicorn, and hide all other colors except pink. Next, choose the second unicorn and hide any colors other than blue. Next, choose the third unicorn and hide any colors other than purple.
Step 9: Click “Weld” on the rectangles and pink unicorns. You can repeat this step for all other rectangles and unicorns.
Step 10: Open a textbox, type your name and resize it so that it fits inside the largest cloud.

Step 11: Click on “Make it” to select vinyl from the cutting material. Place the vinyl on a cutting mat, with the vinyl facing down. To begin cutting, push the start button. Continue to cut all colors of vinyl.
Step 12: Apply the negative vinyl to all designs. Next, cut a piece larger than the unicorn design from transfer tape and place it on top. Use a squeegee to smoothen it. To remove the lines from the transfer tape, peel it off. The bottom of the liner should be folded back.
Step 13: Align purple rectangles with blue rectangles. Place the purple vinyl over the blue. You can smoothen the design with a squeegee.
Step 14: Remove the liner from the bottom and fold it back to expose the rectangles. Align the purple rectangles and the pink rectangles. Place the back liner aside and place the blue and purple vinyls on top of the pink vinyl. You can use a squeegee to smoothen the design. Next, remove the bottom rectangles and pull the entire vinyl design off of the transfer tape.
Step 15: Place the vinyl design onto the jewelry box. Use a squeegee to smoothen the entire design.
Step 16: Cut a small amount of transfer tape. Place it over your name, then rub a squeegee over it. Finally, peel off the vinyl.
Step 17: Place your name on the large vinyl cloud. Use the squeegee to smoothen the surface and then remove the transfer tape.
You can now simply add some necklaces or other trinkets to this diy faux vinyl unicorn jewelry box. This box is also great for holding hair ties and sunglasses. You can also download other SVG files to make a different design for your jewelry box.